How to get access to the API
Overview
To be able to use the discover.swiss API you must register as a developer and we must onboard you as a partner. We will give you access to the test environment without the need to become a partner, but once you get productive we must talk to each other.
- Go to Get the Developer Portal and sign up for an account developer.discover.swiss
- Under Products you can see all available API Products. An API Product is a collection of one or more APIs for which the subscription key will be valid.
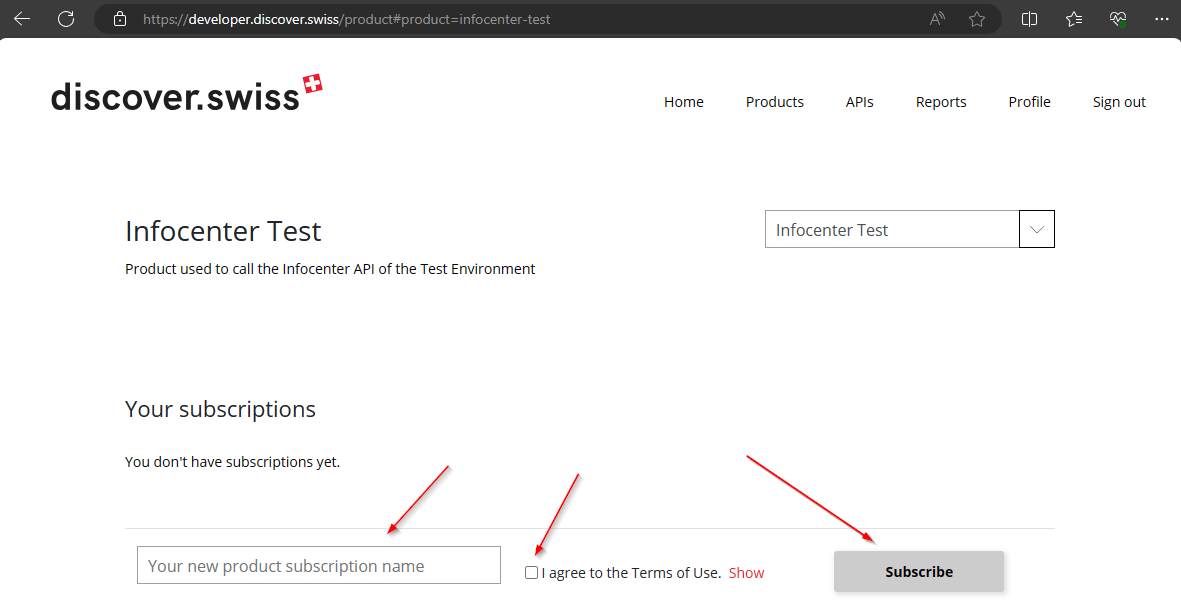
- If you open a Product then you can subscripe to it
 a. On most of the products we need to approve the request. Once you get feedback from us you can access your subscription keys in your profile in the developer portal.
b. Only the Infocenter OpenData Product can be requested without an approval of the discover.swiss Team and you can access your key directly.
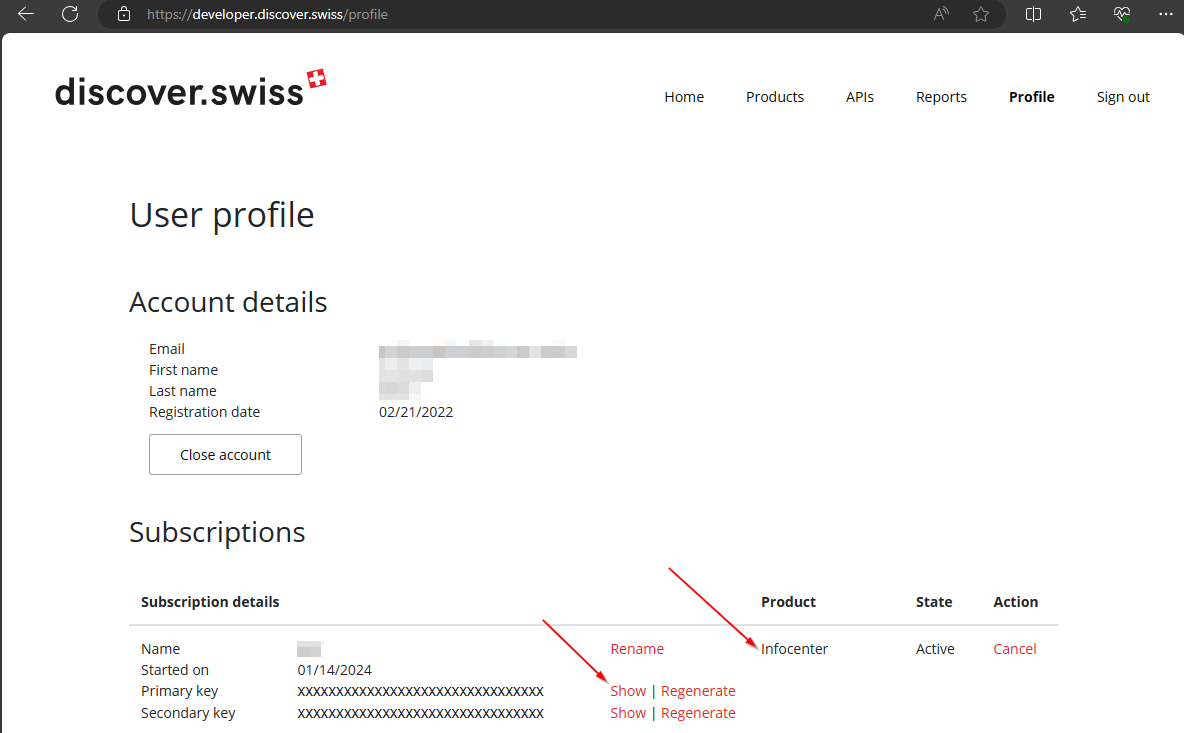
After the request was approved you can find your keys in the Profile section of the developer portal.

Access control
It is important to know who's calling on our API and since we do not provide a UI the application provider (you) must provide the correct identification tokens to get access to the API and the data. All these tokens are sent in Request Headers.
Identification levels

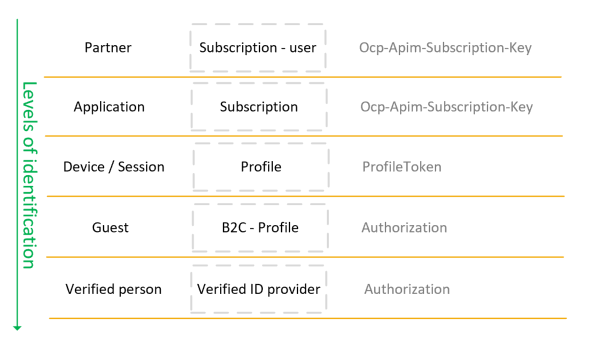
Based on the subcription-key we can identify the partner and the application which is calling. The Partner information we need to filter data especially in the profile service. -> Ocp-Apim-Subscription-Key header
We do provide a (technically) sessionless REST API. But to support the requirement of "as-a-guest" orders and profiles without log-in (authentication) we use profile-tokens which work similar to OAuth2 token but are available without authentication. To identify 1 profile and can be used as a session token on the web or stored in a client app to persist the connection to the current profile. -> ProfileToken header
When a client application offers authentication to a user using our Azure Active Directory B2C, the guest can log in with different social media providers or user/password. In this case, you can use standard OAuth2 or openID connect flows to log the user in and provide the Authorization Bearer token to access the API. -> Authorization header
In the future, we will distinguish between users who logged in with a social account where only the E-Mail is verified or for example with SwissPass or swissID where we can rely on the identity of the user. This identification level is stored and retrievable in the person response.
The following identification levels exist:
- Guest
- EmailNotVerified
- EmailVerified
Request Headers
Language
Accept-Language: {iso-2 language code}
All APIs accept Accept-Language header with two letter ISO (en, de, fr, it) code to request content in different languages. If a language is not available or the header is missing it will serve the default language which is German.
Subscription
Ocp-Apim-Subscription-Key: {subscription key}
You will need to include the appropriate subscription key you can get in the developer portal in EVERY request to the API. If the subscription key can't be passed as a request header then you could pass it alternatively as query parameter (subscription-key=<your-surbscription-key>):
Profile Header
ProfileToken: {jwt}
Without a valid ProfileToken or an Authorization header it is not possible to access the profile or marketplace services.
- Make a request to
/token endpoint to get a profile token token and store it locally similar to a session cookie. - In the token response you will get a refresh token as well. This token can be used to refresh the profileToken after (or better just before) it expires.
Info
In Apps which use the profile service only with authenticated users the authorization header with the OAuth access token is sufficient. The ProfileToken does not have to be requested and added to the request. If both are present they need to fit the same profile.
Note
The desired maximal lifetime of the refresh token can be set in the token-request as well. Not in all scenarios the same lifetime of the refresh token makes sense. For client apps a longer lifetime is better so the user is still "logged in" even after several months of not using the App. But on a web application this is a more serious security issue and the refresh token should only be valid for the duration of an expected user "session".
Authorization
Authorization: Bearer {jwt-token}
We use Azure Active Directory B2C as an identity management service and standard OAuth2 which means you need to include the Authorization Header sending the Bearer {accessToken} in every request. This token identifies the user and is used to select the profile to work with (not query parameters). For more details see Quickstart: Call Azure Active Directory B2C
Best practices
Where to store the API-Subscription Key
Generally, subscription keys used on the client can be "stolen" easily.
On the topic of how and where the API Key is stored in the app, there are different opinions. Our key must be handled in the same way as any API key from Google or DropBox or somebody.
Here are a few ideas: https://stackoverflow.com/questions/14570989/best-practice-for-storing-and-protecting-private-api-keys-in-applications
And here a discussion by Google: https://cloud.google.com/endpoints/docs/openapi/when-why-api-key
If you compile the subscription key in the app it is very hard to change it in case it gets stolen and misused. If you get the key from your server (your own API). It can be changed easily and without a new release. In the end, however, it also requires an access authorization to your API and the problem will only be postponed. If you communicate only through a proxy on your server with the discover.swiss api, the key can't get stolen, but you need to maintain a "proxy", request get slower and we (discover.swiss) do not get useful tracking information from the client directly which can be used for monitoring and DOS detection.
The subscription key is only enough to use the API. But that does not give you any external data, you can only use the services and reload the data you save yourself.
At some point in the future discove.swiss may charged on the traffic and then you would pay the traffic of the key thief as well.
Parameter
Project
A project will be assigned to you which contains all the data requested by your specifications. For example, special entities "Events, Tours, POI, etc.". Moreover, the entities can be located in a particular region or desired structure of administrative areas. It is important to include the assigned project code as the query parameter. On the Infocenter API, the project parameter is mandatory.
For more information see Infocenter service endpoints.
Paging
Always expect a second page
The data deliverd by our Api (except search) is saved in Azure Cosmos DB which is a distributed document database designed to always perform and answer in a meaningful way. To be able to do so it splits up queries into multiple pages of results when: Data volume – Each page of query results is capped at 4 MB. (the select parameter in our api does not affect this) Execution time – Every query execution is capped at 5 seconds. Even if you run a query and results aren’t available yet, you will always get a response back from Azure Cosmos DB after 5 seconds. Performance - There are also cases where the query engine returns results in multiple pages because it’s better for query performance. The query engine may also split up results due to throttling.
These 2 parameters are used to control and handle the paging:
top
This is desired pagesize of the client. In most cases this is what you get. But if you query top=10000 you will most likely NOT get 10000 results but several pages. The top value is overridden by Cosmos DB.
default: top = 10 top = -1 instructs the Cosmos DB to choose the ideal pagesize -> this should be used to download all data
continuationToken
This parameter is needed to get to the next page of data. After calling a specific endpoint, you will get in the response the property nextPageToken which you must use as continuationTokens query parameter for following page request.
"nextPageToken": "[{\"token\":\"+RID:~eSdPAMND6QR0IgAAAAAAAA==#RT:1#TRC:2#ISV:2#IEO:65567#QCF:8#FPC:AgEABQAoAHSiooAigDOQPoABgAHAgCAygDqAFwAqABAIACAEAAAMgAAAQVmAo4EBAgDdlQQCAMm9BQIA4KY=\",\"range\":{\"min\":\"\",\"max\":\"FF\"}}]"
Normally by using a programming language nextPageToken will be encoded correctly. But to define continuationToken manually in Postman you could use following post-response script:
var response = pm.response.json();
var continuationToken = encodeURIComponent(response.nextPageToken);
console.log(continuationToken);

-->
%5B%7B%22token%22%3A%22%2BRID%3A~eSdPAMND6QR0IgAAAAAAAA%3D%3D%23RT%3A1%23TRC%3A2%23ISV%3A2%23IEO%3A65567%23QCF%3A8%23FPC%3AAgEABQAoAHSiooAigDOQPoABgAHAgCAygDqAFwAqABAIACAEAAAMgAAAQVmAo4EBAgDdlQQCAMm9BQIA4KY%3D%22%2C%22range%22%3A%7B%22min%22%3A%22%22%2C%22max%22%3A%22FF%22%7D%7D%5D
Full example
GET {{ infoUrl }}/places?project={{ partnerProject }}&select=identifier,name&top=2&includeCount=true
{
  "count": 28,
  "hasNextPage": true,
  "nextPageToken": "[{\"token\":\"+RID:~eSdPAMND6QR0IgAAAAAAAA==#RT:1#TRC:2#ISV:2#IEO:65567#QCF:8#FPC:AgEABQAoAHSiooAigDOQPoABgAHAgCAygDqAFwAqABAIACAEAAAMgAAAQVmAo4EBAgDdlQQCAMm9BQIA4KY=\",\"range\":{\"min\":\"\",\"max\":\"FF\"}}]",
  "data": [
      {
        "identifier": "plc_4kq_beieaaeb",
        "name": "Naturpark Beverin"
      },
      {
        "identifier": "plc_4kq_cebehdha",
        "name": "Canovasee"
      }
  ]
}
GET {{ infoUrl }}/places?project={{ partnerProject }}&select=identifier,name&top=2&includeCount=true&continuationToken=%5B%7B%22token%22%3A%22%2BRID%3A~eSdPAMND6QR0IgAAAAAAAA%3D%3D%23RT%3A1%23TRC%3A2%23ISV%3A2%23IEO%3A65567%23QCF%3A8%23FPC%3AAgEABQAoAHSiooAigDOQPoABgAHAgCAygDqAFwAqABAIACAEAAAMgAAAQVmAo4EBAgDdlQQCAMm9BQIA4KY%3D%22%2C%22range%22%3A%7B%22min%22%3A%22%22%2C%22max%22%3A%22FF%22%7D%7D%5D
{
  "hasNextPage": true,
  "nextPageToken": "[{\"token\":\"+RID:~eSdPAMND6QRSIwAAAAAAAA==#RT:2#TRC:4#ISV:2#IEO:65567#QCF:8#FPC:AgEABQAkAFKjM5A+gAGAAcCAIDKAOoAXACoAEAgAIAQAAAyAAABBWYCjgQECAN2VBAIAyb0FAgDgpg==\",\"range\":{\"min\":\"\",\"max\":\"FF\"}}]",
  "data": [
      {
        "identifier": "plc_4kq_bceeejfi",
        "name": "Viamala-Schlucht"
      },
      {
        "identifier": "plc_4kq_bhcgahfc",
        "name": "Lady Patricia"
      }
  ]
}